Every new brewer panics at some point. You peer through the glass at your brew, spot something strange on the surface of the SCOBY, and immediately wonder: is this kombucha mold or SCOBY growth? After more than 500 batches and six years of brewing — supplying coffee shops across Tel Aviv — I still get this question more than almost any other. The good news is that the identification is actually straightforward, once you know exactly what to look for.
What a Healthy SCOBY Actually Looks Like
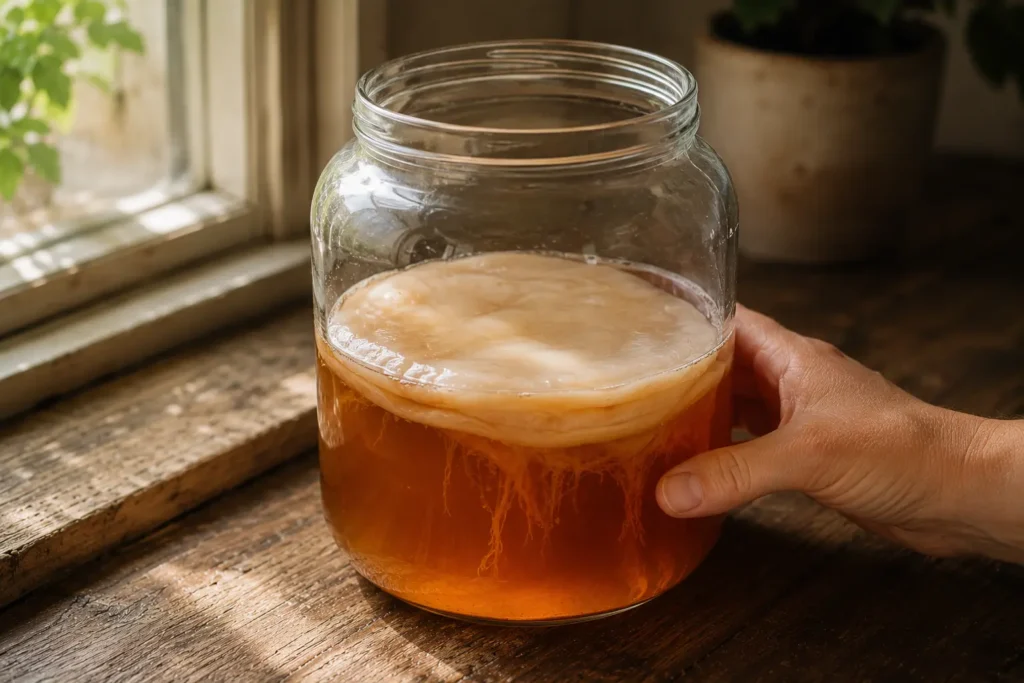
Before you can spot a problem, you need a baseline. A SCOBY typically looks like a pale, slick, rubbery disc — often off-white, beige, or tan — that floats on top of your kombucha tea. Think of a smooth, slightly translucent pancake, or a jellyfish cap. It can also be thicker on one side, develop bubbles underneath, or take on a slightly brown tinge as it matures. None of that is cause for alarm.
You may also notice “strings” hanging down underneath your SCOBY. Those brown strings are the “Y” in SCOBY — the yeast. This is normal, and mold doesn’t typically form beneath the SCOBY. Yeast tends to show up in your brew as brown stringy bits, clumps, or sediment at the bottom of the jar — totally normal, and in fact a sign that your kombucha is fermenting properly.
A new pellicle (the baby SCOBY forming on the surface) can also look alarming at first — thin, patchy, almost translucent. Sometimes, when a new SCOBY is trying to form, it can look like mold, but after a few days, once the disparate parts come together, you’ll realize it’s actually a healthy brew. Patience is your best diagnostic tool in those early days.
Mold: What It Is and How to Identify It
Mold on a SCOBY looks exactly like mold on bread or cheese — it’s always fuzzy. The number one rule: if it’s fuzzy, it’s mold. That single criterion eliminates 90% of the confusion.
Mold can come in different colors — green, black, white, blue, or gray — usually accompanied by a bad or musty smell. It has a fuzzy or dry appearance and can appear as spots on the SCOBY or cover it entirely.
The other critical clue is location. Because mold needs air to survive, it always forms on the surface, near the top of the brewing vessel. If you notice anything underneath your SCOBY or floating in your kombucha, it is probably yeast particles, not mold. In other words: mold grows on top, yeast hangs below.
Generally speaking, mold grows in clumps and circles, which makes it easier to identify. Kombucha SCOBYs are typically brown or tan, so if you see white, blue, green, or black, that could be mold — especially when combined with that telltale dry, fuzzy texture. White alone, however, can be tricky: not all white spots are mold, so use the other identifiers on this list together.
Why Mold Is Actually Rare in a Well-Run Brew
Here is the science that makes kombucha naturally self-protective — and understanding it will make you a far less anxious brewer. The antimicrobial activity is largely attributed to the low pH value, especially the acetic acid produced during fermentation — a mechanism documented in research on kombucha’s antimicrobial activity.
As bacteria in the SCOBY — primarily from the Acetobacter and Komagataeibacter genera — convert alcohol into acetic acid, the brew’s pH drops sharply. Think of it like a force field: as long as the brew acidifies fast enough, mold spores that land on the surface simply can’t get a foothold. Mold can only take hold in the early stages of fermentation, before the brew has acidified. Once kombucha reaches the right pH (around 3.5 or lower), it becomes naturally resistant to mold.
This is exactly why starter tea is your single most important mold-prevention tool. If you didn’t use enough starter kombucha, or the starter wasn’t strong, the brew may not be acidic enough to defend itself. Use pH test strips to confirm your starter is strong and acidic — it should sit between 2.5 and 3.5.
Temperature is the other key lever. Maintaining optimal fermentation temperatures — typically 24–27°C — encourages rapid acetic acid production, lowering the pH quickly and further inhibiting mold growth. If your kitchen drops below about 18°C, fermentation slows dramatically and the window of vulnerability widens. You can explore full temperature guidance in our How to Brew Kombucha guide.

My Own Batch 312 — A Cautionary (and Reassuring) Story
Around batch 312, I was experimenting with a lightly roasted oolong as my base tea. I hadn’t fully strained the leaves — some fine particles made it into the vessel. On day 4, I spotted what looked like small dry white circles sitting right on the pellicle surface. My stomach dropped.
I checked the pH with strips: 3.1. The liquid smelled sharp and vinegary, not musty. I leaned in for a close look without inhaling (a useful habit — don’t breathe over a suspected mold vessel). The white spots had no fuzz whatsoever — they were flat and slightly translucent. I waited 48 more hours, and the spots merged into the forming baby SCOBY layer and disappeared completely. It was new pellicle formation catching on the tea particles, not mold.
The lesson: check pH, check fuzziness, check smell — in that order. All three have to point toward mold before you act. That said, if even one of those checks returns a clear mold signal, don’t hesitate. If too many solid tea dregs or other particles get into the vessel with your SCOBY, they can attract mold — so I now always double-strain my tea before adding it.
What to Do If You Actually Have Mold
Once you’ve confirmed mold — fuzzy, dry, surface-dwelling, and possibly discolored — there is no middle ground. Throw away your SCOBY and any liquid it has touched. Do not ingest any of it or try to “save” it, as mold spores can spread quickly through the whole batch.
After discarding, thorough sanitation of every piece of equipment is non-negotiable. Clean and sanitize everything that came into contact with your kombucha, then start over with a new SCOBY and fresh starter tea. Hot water, plain (non-antibacterial) dish soap, and a white vinegar rinse are sufficient for home brewers. If you want to go further, an iodine-based no-rinse sanitizer works well on glass vessels.
For your next batch, focus on these three pillars to prevent a repeat:
- Use abundant, acidic starter tea — at least 10% of your total volume, with a pH below 3.5. This immediately drops the pH of the new batch before mold spores can establish.
- Keep temperatures in the ideal range of 24–27°C — consistent warmth drives fast acidification.
- Fully strain your tea and avoid adding oils, flavored teas, or fresh fruit to the first ferment. Oils and outside flavor compounds alter the environment and can harm your SCOBY. Avoid flavored teas for the first fermentation unless they’re organic and free of additives — plain green or black tea is your safest base, and you can add flavors during the second fermentation.
It’s also worth keeping a backup SCOBY in a hotel — a separate jar with plenty of starter liquid — precisely for moments like these. For a deeper comparison of how the bacteria in your SCOBY stack up against other probiotic sources, check out our piece on Kombucha vs Other Probiotics. And for a full overview of the fermentation process, our complete library of home-brewing guides is the best place to start.
The good news is that mold is fairly rare when the brew starts with strong starter tea and proper acidity. In over 500 batches, I’ve seen genuine mold fewer than five times — and every case traced back to either insufficient starter tea, temperature dropping too low in winter, or unsanitized equipment. Fix those three variables and you’ll almost certainly never deal with it.
Q: Can I save my SCOBY if I just cut off the moldy part?
A: No — and this is one of the most common mistakes new brewers make. Mold produces invisible spores and mycotoxins that can permeate the liquid and the entire culture, not just the visible fuzzy spot. Cutting the affected area off leaves the contamination behind. The only safe course is to discard the SCOBY, discard every drop of liquid in that vessel, and sanitize all equipment thoroughly before starting fresh. It feels wasteful, but it’s the correct call every time.
Q: My SCOBY has brown patches and dark strings — is that mold?
A: Almost certainly not. Brown coloration and stringy threads are hallmarks of healthy yeast activity. The yeast in your SCOBY produces these strands as a natural byproduct of fermentation, and they often deepen in color the longer you brew. Apply the key test: is it fuzzy? Is it dry? Does it sit on top of the liquid surface in a distinct colony? If the answer to all three is no, you’re looking at normal yeast — a sign your batch is fermenting exactly as it should.
Q: What causes mold to grow in kombucha in the first place?
A: The three main culprits are insufficient starter tea (leading to a brew that starts at too-high a pH), temperatures that are too cold (which slows acidification and extends the window of vulnerability), and contamination via unsanitized equipment, unwashed hands, or debris like unstrained tea leaves getting into the vessel. Oils from flavored or herbal teas during the first ferment can also disrupt the culture’s balance. Address all three and mold becomes genuinely rare.
Q: Is white fuzz on the surface always mold, or could it be something else?
A: White is the trickiest color because new SCOBY pellicle growth, kahm yeast, and actual mold can all appear whitish. The decisive factor is texture: a new pellicle or kahm yeast will be flat, smooth, or slightly film-like and will feel wet if you touch it with a clean utensil. Mold will be distinctly fuzzy and dry, like what you’d see on stale bread. If it’s still hard to tell in the first few days, wait 48–72 hours — real mold will grow visibly fuzzier and spread, while a forming pellicle will flatten out and integrate into the SCOBY layer.
Q: How do I avoid mold when brewing in a cold climate or in winter?
A: Cold is a genuine risk factor because slow fermentation delays the drop in pH that protects your brew. The target is 24–27°C at the vessel. Practical solutions include placing your jar on top of a refrigerator (which emits gentle warmth), using a seedling heat mat with a thermostat, or wrapping the vessel in a towel and storing it in a warm cupboard. Also increase your starter tea ratio slightly in winter — going from 10% to 15–20% of total volume gives the brew a stronger acid head-start when ambient temperatures are working against you. Check pH on day 3 with test strips; if it’s not below 3.5, your brew is fermenting too slowly and needs more warmth.
Home kombucha brewer based in Tel Aviv with 6+ years of experience and 500+ batches brewed. I started Kommbucha.com because the information online was scattered or just plain wrong — I wanted advice from someone who actually brews. My kombucha is sold at local Tel Aviv coffee shops and been gifted many times in Detroit, Michigan .